Hand Gathered Home

  • Our Home
    • Front Porch
    • Entryway
    • Living Room
    • Kitchen
    • Dining Room
    • Master Bedroom
    • Bathroom
    • Nursery
    • Kid Rooms
  • Shop Our Home
  • Shop My Favorite Things
  • Shop My Amazon Storefront
  • Virtual Design Services
    • Meet the Team
    • Portfolio
  • About
    • Disclosure and Privacy Policy
  • Videos

How to Make A Christmas Wreath on a Budget

Projects

12 Nov
4 shares
  • Share
  • Tweet
Making a wreath doesn’t have to be hard or expensive. Check out this step by step process on how to make a Christmas wreath on a budget.

This post is all about how to make a Christmas wreath on a budget. Follow along as I show you how I turned this thrifted wreath into a really cute Christmas wreath.

Thrifted Christmas Wreath Project

This post may contain affiliate links, which means I make a small commission at no extra cost to you.

Supplies

Thrift Store Wreath (here’s a new wreath if you can’t find a thrifted one)

Farmhouse Ribbon (similar)

Faux Evergreen Stems

Faux Cedar Stems

Floral Wire

Pinecones

Longer Pinecones

Before – How to Make A Christmas Wreath on a Budget

This is the “before” of this wreath. Not the worst, but definitely not very cute. It looks cheap and unfinished, definitely very out of shape. I wish I had a photo of it with the large red ribbon on it. The ribbon that it came with was so bad that I ripped it right off and threw it away. It made it even less cute, if you can believe that. Let’s take our supplies and make this DIY Christmas wreath on a budget.

Before Thrifted Wreath Makeover

VIDEO – DIY Thrifted Christmas Wreath Makeover for Under $25

#1 Collect your Supplies

For this wreath, I have several different types of stems, pine cones and some cute striped ribbon. I actually got this wreath from the thrift store for $7.99, with the idea of giving it a total makeover. I’m excited for you to see how it turns out.

To recreate this wreath, you can find what you need linked above. Go check it out!

Before DIY Wreath Makeover

#2 Lay Everything Out

I like to put my stems on my wreath first to decide how I want them to look. This helps to give a great visual of what it’s going to look like when it’s all finished. With this wreath in particular, I rotated between my cedar stems and the pine/evergreen stems. This gave it a uniformed looked (while still looking natural) and helped it to feel balanced. Last, I added the pine cones, which just gave the wreath a really natural look.

Wreath Layed Out

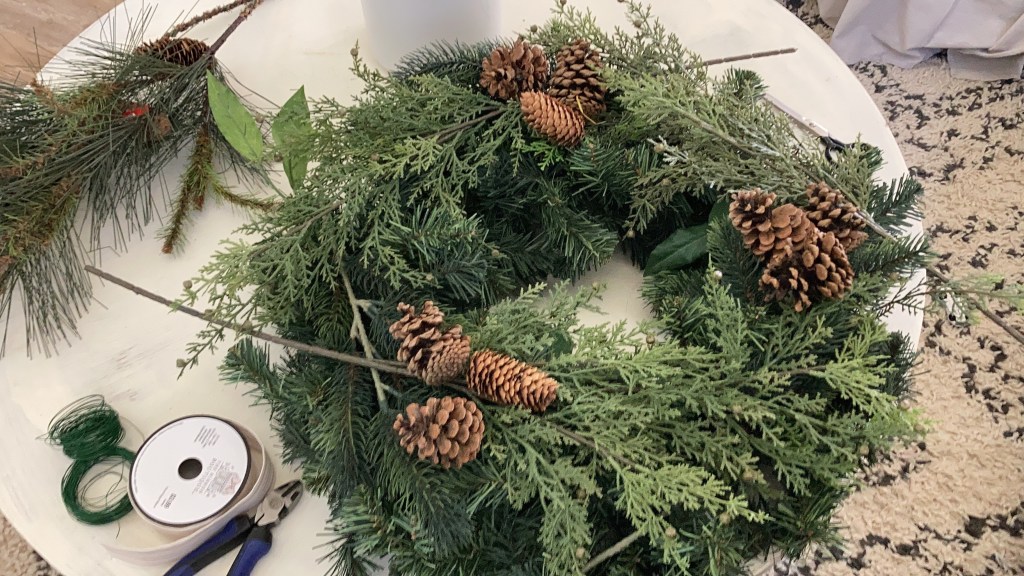
#3 Use Floral Wire to Attach Each Stem

Once you have a layout that you love, you’ll want to start to attach each item. Floral wire is the easiest thing to use here, as it’s easy to work with and helps you to create the wreath you want without any fuss. You’ll need wire cutters and you’ll want to snip the wire into 4-6″ pieces, depending on how much you need to wrap it around. You then just twist the wire around itself until your pieces feel snug.

I added all of my stems, and then added pinecones and a bow/ribbon to really give it a finished look. I used the wire to attach both the pinecones and ribbon, as well as the stems. All in all, I’m really super happy with the way it turned out.

Thrifted Christmas Wreath DIY
Upcycle Wreath DIY

Everything to make this wreath is linked above. Go check it out to make this wreath for your own home. Thanks for reading, friends! As always, you can pin for later below.

Pin for Later – How to Make A Christmas Wreath on a Budget

Share this:

  • Click to share on Facebook (Opens in new window)
  • Click to share on Pinterest (Opens in new window)
  • Click to print (Opens in new window)

Leave a Comment

About Alleigh

« How to Host Thanksgiving on a Budget + Affordable Amazon Table Decor
How to Decorate Your Stairs with Fresh Garland for Christmas »

Leave a Reply Cancel reply

Your email address will not be published. Required fields are marked *

Recipe Rating


So glad you’re here!

Hi! I’m Alleigh. I’m a mom to my two sweet little boys, and wife to a very supportive husband. I’m so glad you’re here! Join me and my little family as we get our hands dirty and add life & personality to our home to create a place that we love.

Find more about me here

Let’s Connect

  • Instagram
  • Pinterest

On Instagram

handgatheredhome

First thrift haul of 2023 blog and video coming to First thrift haul of 2023 blog and video coming to ya on Friday morning 🙌🏼 Have you been thrifting yet this year?? It’s a goal of mine to be better about checking the thrift store first (rather than just looking on Amazon) when we have a need 🙌🏼
We’re talking decorating for winter this week on We’re talking decorating for winter this week on the blog and YT. Stay tuned for that! Sometimes the house feels a little funny and empty after Christmas decor comes down. Let’s fix that! ✨
Ok let’s hear those 2023 home goals! I have all Ok let’s hear those 2023 home goals! I have all sorts of big plans for my house this year and am excited to bring you guys along. What would you love to change in your home in 2023? I’d love to hear! ✨
I did a thing and I painted my bedroom green. Bold I did a thing and I painted my bedroom green. Bold, I know ;) kidding, as it’s practically a neutral hah. But I do love it and I’m glad I branched out! I’m finishing up a post and video on all the details of this room refresh and then I’ll share 🙌🏼 what’s something you’ve been wanting to do in your house but are a little hesitant to commit to?
Sometimes thrifting is overwhelming, I get it. I f Sometimes thrifting is overwhelming, I get it. I found this super fun, textured lamp today for $10 (kind of expensive for Goodwill in my option 😂). But obviously $10 is a good deal in the grand scheme of things. And with a dimmable light bulb it’s 🙌🏼 who knew!
If you want to feel confident thrifting for your home, I have a FREE ebook for you in my bio. I walk you through all of my favorite things to look for at the thrift store and why 🙌🏼 go check it out ✨
Here are 3 easy ways to style an entryway! 1. Cons Here are 3 easy ways to style an entryway!
1. Console table with 2 lamps and a mirror
2. Console table with sconces and a gallery wall
3. Bench with baskets for shoes (hello, function), you could also add hooks 🙌🏼

#virtualdesign #interiordesign #entrywaystyle #entrywaydecor #entryway #entrywaytable
Check out this before and after from a recent proj Check out this before and after from a recent project of ours 😍
#beforeandafter #virtualdesign #handgatheredhome
Sometimes I miss our old house, because it felt so Sometimes I miss our old house, because it felt so much more put together than our current house. Projects with a toddler and a baby are no joke. But so worth it once they’re done 🙌🏼 working on getting back in the groove of sharing projects over here. I have a few up my sleeve that I’m excited to share soon 🙃
Load More...

Copyright © 2023 · Refined theme by Restored 316

4 shares
 

Loading Comments...